Keen hikers head to the Dolomites in Italy every summer to explore a spectacular network of interconnected trails, including the fabulous, though undeniably tough, Alta Via 2. The multi-day hike winds through one of the world’s most dramatic mountain ranges featuring dolomite limestone peaks, soaring spires, sharp pinnacles, jagged ridges, and rugged walls that tower above forests and high alpine meadows.
There are many long hiking days on the Alta Via 2 – and some with significant exposure which can be a mental challenge. The worst for me was on the final afternoon on route to the Rosetta Hut though John and our friend Scot and no issues at all. We did carry a climbing helmet and Via Ferrata gear and used it on at least a half dozen cabled sections. It certainly gave me a lot more confidence.
Looking back at the photos, I’m in awe of the landscapes we trekked through on the Alta Via 2 – such rugged beauty, interspersed with small mountain towns, rifugios where you can spend the night and purchase food and wine, surreal sunsets and sunrises – and a lack of crowds, save for a couple of places close to roads. It truly is one of the world’s top treks and one I enthusiastically recommend.
This post includes some affiliate links. If you make a qualifying purchase through one of these links, I will receive a small percentage of the sale at no extra cost to you. I very much appreciate your support.
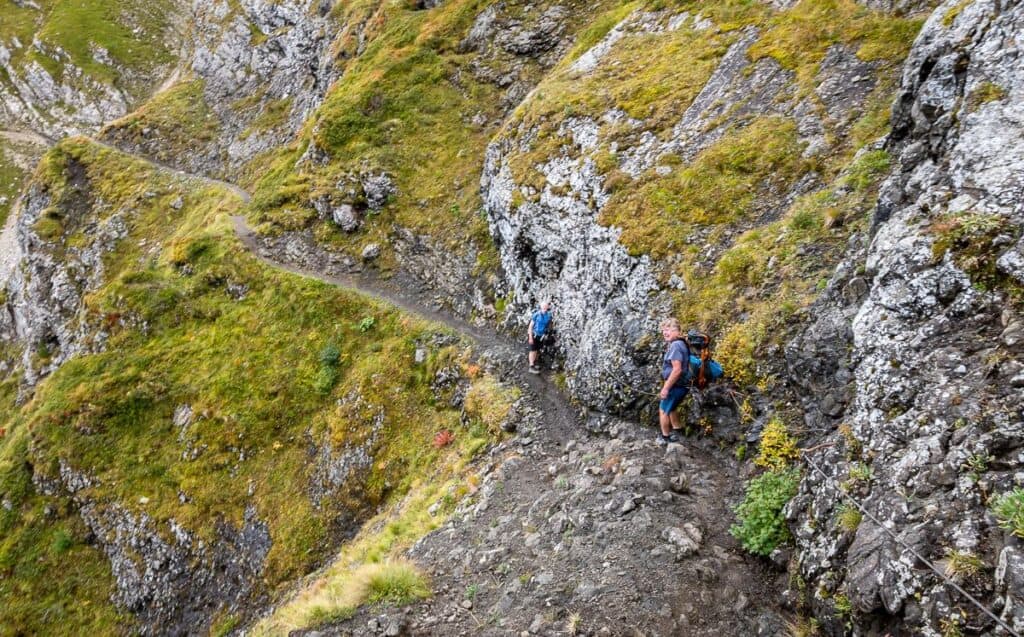
Some exposure on the way to Rifugio Mulaz
Alta Via 2 summary
Total distance: 187 km (116 miles)
Total elevation gain/loss: + 10,547 m (34,603 feet)/-11,450 m (37,566 feet)
Days needed for the whole trail: 11 – 14 (We stopped at the Rosetta Hut after 8 days – a popular end point as it is reportedly harder the rest of the way to Feltre.)
Start and end points – if you do the entire Alta Via 2: Plose gondola station near Bressanone (Brixen) and a finish at Passo Croce D’Aune near Feltre. We finished in the town of St. Martino di Castrozza.
Best time to hike the Alta Via 2: The third week of June to the third week of September. There may be snowfields to cross if you go early and snowstorms later in the season. We did it from late August to September 7th – which was pretty much ideal.
Which direction to hike: Most people hike from north to south but it doesn’t matter unless you’re following the Cicerone guidebook to a tee.
Navigation on the trail: The trail is well marked along its length. Look for red and white paint splashes, cairns, and occasional triangle symbols with the number 2 inside it.
Self-guided hiking tours: It’s a lot of work to figure out the logistics of the Alta Via 2 hike – especially which rifugios to book and when. We opted to book through Canmore, Alberta-based On Top Mountaineering. They know the region very well and were very responsive. All three of us loved the itinerary they put together for us.
Hiking guidebook: If you’re planning to organize your on trip, purchase one of these guidebooks.
Alta Via 2 – Trekking in the Dolomites – includes 1:25,000 map booklet (published by Cicerone in 2022)
ALTA VIA TRAILS HIKING GUIDE 2025–2026: Explore the Dolomites’ Legendary High Routes, Alta Via 1 & 2, Rifugios, and Insider Trekking Tips by Rowan Wildhart (published Nov2025)
Hiking the Dolomites (Alta Via 1 & 2): A Comprehensive Guide to Walking Routes, Mountain Towns, and Adventure Travel Across Trentino, South Tyrol & Veneto – For All Experience Levels by Raina Cailot (published May 2025)
Good to know: The Dolomite region is in the South Tyrol – an area where two official languages exist – Italian and German. You’ll find that most towns and even rifugios have two names – hence Brixen and Bressanone, our starting point. It’s quite confusing at times.
Grand scenery on the Alta Via 2 shortly after leaving Puez Hut – and heading for Rifugio Boe
Getting to the start and end points of the trail
Bressanone /Brixen: We flew into Munich and caught a train to Bressanone/Brixen near the start of the Alta Via 2 – though we reserved seats several weeks out on the Deutsche Bahn website. Bressanone/Brixen is a pretty town with good restaurants, outdoor gear stores – should you have forgotten anything, and supermarkets. I suggest purchasing a few days worth of lunches here.
St. Martino di Castrozza: I had done a lot of research before we left home via the Rome2Rio website. I knew we’d need to take a couple of buses and the train to get to the Venice Airport – our destination post hike. Instead with three of us, we split the costs and used N.C.C. Taxi out of San Martino di Castrozzo. It made life very easy with a pickup at our hotel and drop off at the airport. Their phone number is +39-348 6484985.
Passo Croce D’Aune near Feltre: Dolomiti buses and trains service Feltre – which is just an hour from the Venice Airport. Omio is a good website for Feltre to Venice trains. Brusutti Bus is a good website for checking out the buses between Venice and Feltre.
Getting back to Bressanone/Brixen from Croce D’Aune: First take a bus to Feltre from Croce D’Aune. Connect with a bus to Trento. Finally take a train from Trento to Bressanone.
Looking down at St. Martino di Castrozza from the gondola near Rifugio Rosetta
Packing tips for the Alta Via 2
We tried to pack lightly though others we saw on the Alta Via 2 trail did way better than us. I used the 44L Osprey Tempest backpack which I loved. I found with rain gear, warm weather clothing, a climbing helmet, a Via Ferrata set, toiletries, a camera and charging equipment, day hiking clothes and a few assorted odds and ends that I needed the full amount of space.
If you purchase lunch from one of the rifugios you’ll likely get an apple and a big honking sandwich – which also takes up a lot of room. Kudos to those of you who go lighter than me.
Detailed packing list for the Alta Via 2 hike
Sunglasses with good UV protection
sunscreen and lip protection with high SPF
one to two litre water bottles
personal first aid kit (with a blister kit, prescription meds, contact lenses, anti-inflammatory),
toilet paper
packing cubes to keep your pack organized and Ziplock bags
portable power bank, camera and charger,
maps, GPS, altimeter (we only used Organic Maps)
passport, credit cards, health and travel insurance documents.
Hiking gear
Light trekking boot with a fairly stiff sole for rocky terrain
Daypack (32 – 45 L)
Either thin leather gloves or bike gloves for the Via Ferratas or chain sections maps
microspikes for early or late in the season
Via Ferrata clip in set (we borrowed ours from our outfitter in Canmore) includes a climbing helmet, climbing harness, and two locking carabiners.
Hiking clothes
Wind and waterproof shell jacket with hood
Lightweight trekking pants
Merino wool base layers – tops and bottom
2-3 pairs of good hiking socks
Warm hat and synthetic or wool gloves
Sun hat and a bandana or buff
You might like: Best Hiking Gear 2025 – 2026
John kept his good camera in a waterproof bag attached to his daypack
Most days in early September we were hiking the Alta Via 2 in shorts and t-shirts
Rifugios and hotels we stayed in
Brixen/Bressanone – Gruner Baum Hotel – great location, wonderful room and awesome breakfast
Schlüterhütte/Rifugio Genova (+39 333.4809.559) – book online via their website – we got a large private room. No heating but lots of blankets. You can get shower tokens from the front desk. Check in is after 3pm and check out is at 9 AM. A fun hut, great vibe – overflowing with mountain bikers when we were there. Busy. A la carte menu for dinner.
Puez Hut (+39 0462 601723) – You can book online starting in mid-February. The hut was my least favourite – though it enjoys an incredible setting and their patio is fantastic. However, the dorm rooms are crowded with triple bunks and the set-up for signing in is slow. And their bagged lunches are not worth the price.
Sunrise from Puez Hut on the Alta Via 2
Rifugio Boe/Bamberger (+39 0462.752100) Located up on the Sella Plateau, this is one clean, fresh-feeling and friendly rifugio. There are lots of private rooms but don’t count on a lot of space.
Looking at Rifugio Boe from a rock formation above the hut
Hotel Cesa, Canazei (+39 0462.752100) This hotel was a total treat. It did take us two bus rides to get here – but to have some privacy and get our clothes cleaned was so worth it. Your other option on the Alta Via 2 is Rifugio Fedaia right on the road after you have descended from Pordoi Pass.
Rifugio Fuciade (+39.0462.752100) This rifugio is really a charming small hotel with incredible views, lovely rooms, amazing food and one of the best breakfast spreads you’ll find. And it’s right on the trail. Highly recommend!!!
Pretty scenery right outside Rifugio Fuciade
Rifugio Valles (+39.0462.752100) A simple spot on the road with private rooms and friendly service. Their food was better than most of the rifugios. Email them to book a room.
Rifugio Mulaz (+39 0462.574281) John and I were lucky to have a private room, but our friend Scot was in a dorm with people sprawled every which way. Survivable for a night but hard to get a good sleep. On the plus side – a gorgeous setting, friendly innkeepers and decent food. They also let you in early as it’s a short day from Rifugio Valles. You can book online.
Looking down at the Mulaz Hut from the trail to Rosetta Hut
View from Rifugio Mulaz at sunset
Rifugio Rosetta (+39 0437 599420) You can book the rifugio online. It’s accessible to both hikers and people wo have taken the gondola up from St. Martino di Castrozza. The setting is spectacular, and the rooms small but okay. Liked the vibe.
Rifugio Rosetta at sunset
Useful information for the huts
Every hut or rifugio has its own vibe and set of rules.
You must leave your hiking boots in the boot room. Tie the laces together so they don’t get separated.
Use the drying room for wet gear.
Order picnic lunches before dinner. In all honesty, I didn’t think the lunches (dried bread and a slice of cheese plus an apple) were very good and would recommend purchasing food in towns you visit. I wish I’d brought a jar of peanut butter from home.
Respect quiet time from 10 PM – 6 AM.
Pack out your garbage.
Some huts have Wi-Fi – others do not. Don’t count on it.
Water in huts is expensive to purchase.
What you need for the rifugios
Hut slippers and a lightweight sleeping bag liner are mandatory
Carry some Euros.
Ear plugs,
Italian plug adaptor for charging.
You’ll also need a headlamp especially useful if you need to use the bathroom in the middle of the night.
An Italian Alpine card will get you discounts at huts.
Charging phones
Most of the rifugios have a set up for charging phones though none are in dorms or private rooms. I would recommend putting an identifying feature on your phone.
Everyone trying to charge phones in rifugios ay the same time
Alta Via 2: Day 1 – Plose gondola station to Schlueter Hut/Rifugio Genova
Distance: 15.4 km
Walking time: 6.5 hours
Elevation gain/loss: + 950 m/3117 ft / -680m/2250 ft
Difficulty: An easy day by Alta Via 2 standards
Shorten the day: Some options include booking a licensed jeep taxi to take you to either Plose Hut or Halsl Hut. There are bus options too from Brixen to the Zanser Hutte bus stop – and that gets you to within 3.8 km of Schlueter Hut.
Path numbers: 7, 6, 4
Experience: Our day started with a pre-planned taxi ride from our hotel in Bressanone/Brixen to St. Andrae/San Andrea and the base of the Plose Gondola. After getting the requisite photos at the top of the gondola, we started the Alta Via 2 hike on trail #7 at the top of the station. Reach the Plose Hut in about 90 minutes, after climbing 440 m over 2.3 km.
From the hut descend along a ridge to the Lusner Scharte. Turn right and continue the descent, first on trail #6 and then #4 to arrived at a paved road. We found a comfortable grassy area to enjoy lunch with a view of high pasture farms.
Stay on trail #4 as it switchbacks up a rocky basin into the Peitlerscharte notch. Turn right on trail #4 and enjoy easy hiking with superlative views to Schlueter Hut/Rifugio Genova at 2,301 metres. This was one of the easiest days we had on the Alta Via 2.
Starting the Alta Via 2 at the Plose Gondola under cloudy skies
The final easy stretch of hiking to Schluter Hut/Genova Hut
The friendly Schluter Hut/Genova Hut
Alta Via 2: Day 2 – To Puez Hut
Distance: 12 km or 7.5 miles
Walking time: 5 – 6 hours
Elevation gain/loss: + 900 m/2953 ft / -700m/2297 ft
Path numbers: 3, 2
Experience: From the Schlueter Hut pick up trail #3 via Kreuzjoch/Forcella S Zenin. The trail contours around the western aspect of Wasserkofel and then heads up a steep scree slope that hold snow for a long time (see photos below) to reach the saddle, Focella de la Roa.
The route is straightforward from the saddle as it crosses a scree slope – but the trail through the Nives Scharte notch isn’t revealed until you’re standing in front of it. After suiting up in our Via Ferrata gear on flat ground – we head off. I am pleasantly surprised at how much fun I have climbing through the notch thanks to cable protection to arrive at Forcella Nives, a flat, open area that’s perfect for lunch.
From there descend on loose gravel via trail #3 into the Roa Valley. There is an option to take a shortcut part way down but if you make that choice you’re in for a 10 – 15-minute section secured with cable where you need a good head for heights. We opted to stay on the main route as it curved along the hill above the cliffs until the Puez Hut came into view. With a mid-afternoon arrival, we sat with a cup of tea and a piece of apple strudel admiring the view, while waiting for the 4:30 official opening of the hut.
Almost at the Focella del la Roa saddle
Looking across from the saddle to the Nives Scharte notch we’ll end up climbing with Via Ferrata gear
I had a lot of fun on the cable section to Puez Hut
Lunch time views at the top of the Via Ferrata section – before a big descent
Heading down through a long rocky section towards Puez Hut
Gorgeous views on the way to Puez Hut
Almost at Puez Hut – a popular hut on the Alta Via 2 for day hikers to visit for food and drink
Alta Via 2: Day 3 – To Rifugio Boe/Bamberger
Distance: 16.2 km
Walking time: 8 – 10 hours
Elevation gain/loss: +1430 m/4,692 feet / – 1140m/3740 feet
Path numbers: 2/666
Experience: Today was quite the day with a lot of variety underfoot and some challenges. After watching an amazing sunrise and eating breakfast, we head off on the Dolomites High Route #2. This part of the hike is easy and beautiful as we cross the Puez Plateau and then three saddles – Forcela Ciampei/Ciampei Saddle, then Ju de Crespeina/Craspeinajoch Saddle and finally the Forcela Cir Sassle.
After passing the Jimmy Hut we descend to Gardena Pass/Groedner Joch, a section of trail that is very beautiful – but also extremely busy. There were non-stop day hikers coming up from the pass – so we constantly had to pull over to let groups go by. It was a good reminder of why we had chosen the more difficult Alta Via 2 as we only ran into crowds like this on a couple of occasions over eight days.
From Gardena Pass where you’ll find restaurants, huts and road transportation, cross the road and continue on the Dolomites High Route #2. After a short climb we reach an intersection – where there are two options to get to Pisciadu Hut – Val Setus – the original Alta Via 2 route or the the Val Medzi/Colfosco Tower variation.
We opt for the Val Setus route as it is supposed to save an hour of hiking time – but it comes with a steep ascent, rockfall hazard (put your climbing helmet on), possible snow at least early in the season and a long cable-protected section where Via Ferrata gear is recommended. It’s used as a descent route from Pisciadu Hut so it can be busy. It turned out to be a good choice as someone had fallen on the Via Ferrata section on the other route – blocking access for an hour.
The Pisciadu Hut is a good place for lunch though it’s also popular for an overnight stay. After a snack we descend to the lake and pick up trail #666 leading up through rocky terrain with more cable protected sections. You end up in Val di Tata – a rocky valley – and the trail here is finally less technical. However, the fog rolled in, so we really had to focus on finding trail markers. Unfortunately, we couldn’t see any of the beautiful mountain scenery this area is famous for.
After reaching a high point on the Sella Plateau we continued on #666, passing the turnoff on our right to trail #649 and #647. Trail #666 splits at the Forcella Antersass. On the right you can take the Koburger Weg trail – another Via Ferrata route but we stayed on the easier #666, continuing along the ridge (though in the fog we couldn’t tell) to Antersass Peak. On a clear day you would get views of the glaciated Zillertal Alps on the border with Austria from here. The trail descends and just before the saddle the Koburger Weg joins from the right, After a short climb reach Rifugio Boe Hut – a lovely newer hut in an austere location on the Sella Plateau.
A steep ascent via the Val Setus Valley- part of the original Alta Via 2 route
The Pisciadu Hut – a good place for a meal or a night
Trail #666 on the far side of the lake takes you to the Boe/Bamberger Hut
The Sella Plateau at almost 3000 m sees its fair share of bad weather – including dense fog
We can barely pick out the building on arrival at Boe Hut
Alta Via 2: Day 4 – To Hotel Cesa in Canazei via Passa Pordoi
Distance: 10 km
Walking time: 5 hours
Elevation gain/loss: +530 m/1,40 feet / -600m/1,969 feet
Path numbers: 627, 601
Option: On a sunny day it would be very worthwhile to climb Piz Boe behind Boe Hut for food and drinks that come with one of the most panoramic views in the Dolomites.
Experience: We went from the highest point on the Alta Via 2 – the Boe Hut to the lowest – the town of Canazei. The day started with an easy 3 km mostly flat hike across the Sella Plateau to the Pordoi Hut at the top of Pordoi Pass. We opted to take the Sass Pordoi Gondola down from the top of the Sasso Pordoi Summit because of the foggy weather. At the bottom of the gondola, we enjoyed lattes and baked goods before walking down the main road to pick up trail #601.
The next section is called the Viel dal Pan/Binelweg or Bread Trail – used by flour and bread traders back in the day as a means of connecting the valleys of the Dolomites. On clear days you’re treated to views of the glaciated northern aspect of Marmolada, the highest peak in the Dolomites. We managed some fleeting views.
The next part of the hike took us to the Col de Cuch Saddle and from there we contoured along the Bread Trail for 7.1 km You pass Rifugio Viel dal Pan – a hopping place at lunch with a view. Look for chains on the steep sections as the trail as it descends to Passo Fedeja Pass. Once at the highway just up from the Lago di Fedaia reservoir you’ll find a couple of small hotels and bus stops.
We took two buses to reach Canazei – about 30 minutes away. There we had a break from the dorms and enjoyed an upscale stay and amazing breakfast at Hotel Cesa. We also got everything we owned washed and dried for 10 Euros. Such a treat!
At the top of Pordoi Pass beside Pordoi Hut
Looking at the steep trail that takes you to the top of Pordoi Pass from the gondola
Onto Trail #601 after a walk through the village at the bottom of the gondola
On the Viel del Pan or Bread Trail (#601) – which offers great views of Marmolada – the highest peak in the Dolomites
One of the busier and easier sections of the Alta Via 2
On a sunny day the scenery along this section of the Alta Via 2 would be amazing
Lots of wildflowers around in early September on the Alta Via 2
Taking a break at one of the mountain huts that serves lunch along the Viel del Pan
Looking down to Lago di Fedaia – our goal is a bus that travels beside the reservoir
It’s a steep descent with chains in places on the way to Passo Fedeja Pass
Alta Via 2: Day 5 – To Rifugio Fuciade
Distance: 12.6 km from Alba di Canazei via Contrin Hut to Fuciade Hut
Walking time: 6 – 7 hours
Elevation gain/loss: +1200m/3,937 feet / -710m/2329 feet
Path numbers: 602, 607
Experience: We start the day with a superb breakfast followed by a 10-minute bus ride to Alba Impianti Ciampac. Then we start looking for the trailhead to the Contrin Hut located near La Cacciatora Hotel. Once on the 602 trail – really a jeep track – we hike steeply up through a forest climbing 530 m over 5.1 km. It’s mostly a slog with little in the way of views until you reach the Contrin Hut.
Just above the Contrin Hut you’re back in the high alpine with lots of wildflowers around. We follow #607 which takes us into a steep rocky alpine basin – and ultimately to Cirele Pass at 2690 m. The views are quite lovely in this section though it’s desolate as you near the pass.
From the pass it’s a fun descent of around 700 m in good scree all the way down to a rocky trail that leads to pastoral meadows. Finish at the lovely Fuciade Hut – with its gorgeous location looking out to the Pala Range.
We take Path #607 towards Pas de la Cirele
It’s a fantastic hike in the high alpine on the way to Fuciade Hut
Sweet Dolomites backdrop
Looking down in the direction of the Contrin Hut
Getting into an austere environment
Good scree for a fun fast descent to Rifugio Fuciade
Fuciade Hut is down in the distance
Alta Via 2: Day 6 – To Rifugio Valles
Distance: 9.2 km or 5.7 miles
Walking time: 5 hours
Elevation gain/loss: +400m/1312 feet / -340 m/1115 feet
Path numbers: 607, 658
Experience: Today is a short easy day with no exposure. Turn left outside the Fuciade Hut and start out on trail #607 to Pellegrino Pass. The foot traffic heading the other way is heavy – and a little annoying. Once we hit the main road heading to San Pellegrino Pass, we continued uphill for a few hundred metres to reach the continuation of #658 on the other side of the road.
The trail climbs up through the forest and then into open terrain with good views of the northern Pala Range. At the highpoint – Forcella die Pradazzo descend on the #658 – still a jeep road all the way to Valles Pass. On this section we met some cows who were very keen on licking salt off any exposed human arms. Give them a wide berth if you wish to avoid the experience. Turn right on the asphalt road and the Passo Valles Hut is immediately on your right. It’s got a nice outdoor patio to enjoy a drink.
Descent towards Valles Pass
A pretty spot for a stop only about 25 minutes up from Valles Pass
Alta Via 2: Day 7 – To Rifugio Mulaz
Distance: 6.2 km = 3.9 miles
Walking time: 4.5 – 5.5 hours
Elevation gain/loss: +750m/2461 feet / -240m/787 feet
Path numbers: 751
Experience: Cross the road to pick up trail #751. It climbs steeply offering good views back towards yesterday’s hike. After a solid hour of hiking reach the Forcella Venegia saddle. We continued left just below the ridge and met about a half dozen Haslinger horses on the trail. (On bad weather days go right on #749 to Rolle Pass and ultimately Mulaz Hut.) Traverse a side hill slope to reach Venegiotta Pass.
The trail contours around the north ridge of Monte Mulaz and then splits after roughly 15 minutes. The most direct route – which is the one we took, stays on the #751 and continues to descend. There are some cable protected sections along here.
That’s followed by a steep climb up a wide gully with more cable-protected sections along the way. Once out of the gully, the hiking on this section of the Alta Via 2 is easier all the way through to Mulaz Hut. We arrived at lunch time – and were welcomed inside, despite the early hour. We were very thankful as the weather deteriorated all afternoon – and then cleared in time for a surreal sunset.
Heading for Venegiotta Pass
There is some exposure on this section of the Alta Via 2
You can just see Mulaz Hut off in the distance
Alta Via 2: Day 8 – To Rifugio Rosetta
Distance: 6.5 km (4.0 miles)
Walking time: 5.5 – 6.5 hours
Elevation gain/loss: +750m (2460 feet) / -700m (2297 feet)
Path numbers: 703
Experience: Today was a mentally tough day for me – primarily because of significant exposure for approximately 90 minutes (I was going very slowly) a few hours out from Rifugio Rosetta. All I could do was picture falling off the narrow path onto a grassy slope and cartwheeling over a 1,000-foot cliff. My husband noticed a memorial to someone who had died – probably doing exactly that. And a woman we had met at the start of the trail said she felt physically sick on this section. Other people love it – but you’ve been warned. Do not attempt it under wet or snowy conditions.
From the Mulaz Hut take trail #703 pictured below. It climbs steeply switchbacking up the rocky hill. From the top of the first section traverse beneath steep rock faces to reach a steep cable protected area that takes you through a lot of rubble all the way to Farangole Pass, the high point of the day.
From here descend steeply on loose rock into the Val Grande valley. Ultimately the trail starts to contour above a grassy slope with significant exposure. There are smaller ups and downs, the very occasional cable protected area and a few clefts in the hills where you can take a break. Take your time through here and watch your foot placement. When the gnarly section is over, you’re home free. It’s an easy final descent to the valley bottom and then a gradual climb up through the rock to Rifugio Rosetta with its amazing location.
John on the cable section on the Alta Via 2 on route to Rifugio Rosetta
Quite the backdrop on the descent after the cable section on the Alta Via 2
The start of an exposed nasty section on the Alta Via 2 that I hated; it took me about 90 minutes
Looking back to where we had come from on the Alta Via 2 – though it doesn’t show the gnarly part as my camera was packed away
One more climb and we’ll be at the Rosetta Hut – our last overnight stop on the Alta Via 2
Almost at the Rosetta Hut on the Alta Via 2
Loads of trails emanating from the Rosetta Hut area
Finish in St. Martino di Castrozza
After a night at Rifugio Rosetta, we all opted to descend to St. Martino di Castrozza instead of having another epic day on the Alta Via 2. We had planned to hike to Pradidali Hut, but after reading about all the exposed sections, including a trail that cuts through steep rocky or grassy terrain where stumbling could result in consequences – just like the day before – we decided to give it a pass.
If you do the loop from the Rosetta Hut to Pradidali Hut and back to the Rosetta Gondola, you’re looking at 6 – 7 hours of hiking over 8.4 km with a gain of 900 m and a descent of 850 m. Avoid this route altogether if it’s wet or snowy.
To get to St. Martino di Castrozza simply walk to the gondola station – within sight of Rifugio Rosetta and enjoy the ride down.
Heading for the gondola station that will take us to St. Martino di Castrozza and the end of our Alta Via 2 adventure
You can climb Cima Rosetta Peak for excellent views before descending on the gondola
Your other option is to do the steep hike down to St. Martino di Castrozza
More multi-day hikes in Europe you’ll love
Fisherman’s Trail, Portugal – A Hiking Guide – easy to organize on your own
Hiking La Gomera – A One Week Itinerary – one of the quieter Canary Islands
Kungsleden Trail Guide: Abisko to Nikkaluokta – above the Arctic Circle in Sweden
Hiking on Gran Canaria – A One Week Itinerary
7-Day Lofoten Islands Itinerary With A Hiking Focus – amazing selection of day hikes in Norway
Click on the photo to bookmark to your Pinterest boards.
The post Alta Via 2: My 8-Day Trek Through the Dolomites & What to Expect appeared first on Hike Bike Travel.